
Automotive
A windshield scratch is worth fixing yourself only if a fingernail slides across it without catching. If it catches, or if it sits anywhere in your direct line of sight, skip the polishing kit and get it looked at by a professional. Before anything else: stop running the wipers over it, brush away any grit, and run the fingernail test to find out what you’re actually dealing with.
TL;DR:
- DIY repair is only suitable for shallow scratches that do not catch a fingernail and are located outside the driver’s primary view or camera zones.
- Removing a scratch involves grinding down the glass, and improper polishing can cause optical distortion, halos, or a visible dish if too much material is removed.
- Using household abrasives like toothpaste or baking soda typically worsens the damage by creating hazy, permanent scratches rather than leveling the existing one.
- Professional repair requires controlled procedures, steady water cooling, and temperature monitoring to prevent compromising the windshield’s structural integrity or ADAS calibration.
- Costs for professional repair are generally around $79 to $129, while replacement and calibration can total $250 to $700, especially if the scratch is deep or in a critical zone.
Table of Contents
- How Do You Know If a Windshield Scratch Can Be DIY Repaired?
- How Do Professionals Decide If a Scratch Is Repairable?
- DIY Methods: Cerium Oxide Kits and Why Household Hacks Usually Fail
- What Does a Professional Windshield Polishing Procedure Actually Look Like?
- What Can Go Wrong With DIY Windshield Scratch Repair?
- What Tools and Materials Do You Need for Windshield Scratch Repair?
- What Does Windshield Scratch Repair Cost?
- How Do You Choose a Windshield Repair Professional?
- Can Resin Fill a Deep Windshield Scratch?
- How Do You Keep a Windshield Scratch Repair Looking Good?
- When Does a Windshield Scratch Become a Safety Issue?
- Do Weather and Humidity Affect Windshield Scratch Repair?
- A Pro’s View on Choosing Safety Over a Perfect-Looking Fix
- Get a Professional Windshield Scratch Assessment From Auto Glass Kings
- Sources
- FAQ
How Do You Know If a Windshield Scratch Can Be DIY Repaired?
The fingernail test takes about ten seconds and tells you almost everything you need to know before spending a dime on a kit. Drag a clean fingernail across the scratch at a right angle. If your nail glides over it smoothly, the damage is likely confined to the outer coating or the top layer of glass, which makes it a reasonable DIY candidate. If your nail catches, dips in, or hangs up even slightly, the groove is deep enough that polishing is unlikely to remove it without unacceptable optical distortion.
Location matters just as much as depth. A scratch sitting in the driver’s direct sightline, near the edge of the glass, or anywhere over a windshield-mounted camera or sensor changes the calculus even when the nail test says “surface only.”
- Run the fingernail test in at least three spots along the scratch, since depth often varies along its length.
- Check whether the mark falls inside the driver’s primary viewing area (roughly the arc swept by the wipers directly ahead of the steering wheel).
- Note any position near the windshield edge or a camera bracket, where flaws are harder to polish safely.
- Stop using the wipers over the damaged area immediately. Grit trapped under a blade turns one scratch into several.
- Swap a torn or chattering wiper blade before you do anything else. A damaged blade is often what caused the scratch in the first place.
- Wipe the area with a clean microfiber towel to clear loose dust and grit before you evaluate further.
If the scratch fails the fingernail test or sits in that critical zone, the safe move is professional evaluation rather than a home fix.
How Do Professionals Decide If a Scratch Is Repairable?
A scratch is a groove, not a crack or a chip. That distinction trips up a lot of DIYers who assume any windshield damage can be filled with resin the way a rock chip gets filled. Resin repair works because a chip creates a cavity with air pockets that resin can flow into and cure inside. A scratch has no cavity. It’s a linear channel cut into the surface, and the only way to make it disappear is to grind the surrounding glass down until the groove is gone.
That’s the part most people underestimate: removing a scratch means removing glass, not filling a gap. Every pass of a polishing pad takes off a microscopic layer of material, and the goal is to take off just enough that the deepest point of the scratch matches the new surface level. Go too shallow and the scratch remains. Go too aggressive and you’ve created a low spot that never quite blends back in.
This is exactly why the fingernail test carries real weight instead of being some folk trick. A scratch a nail can’t catch is usually very shallow, confined to the glass’s outer surface, or in the thin protective layer some windshields carry. That amount of material can be polished away without meaningfully altering the windshield’s optical geometry. A scratch a nail catches on has already cut into deeper structural glass, and leveling it out would mean removing enough material to risk a visible depression, sometimes called a “dish,” across the repaired zone.
Here’s where things get technical, and where amateur jobs go wrong most often. Professional glass technicians know that to avoid a dish, they can’t just polish the scratch line itself. They have to blend the removal over an area many times wider than the scratch, feathering the edges gradually so there’s no sharp transition where light bends differently. Skip that blending step, and you get a spot that looks clear head-on but throws distorted reflections, halos, or a rippled effect the moment sunlight or oncoming headlights hit it at an angle. In a driver’s direct field of view, that kind of distortion is often worse to deal with than the original scratch, particularly at night when headlight glare finds every imperfection in the glass.
That optical tradeoff is the whole argument for a conservative approach. Removing a shallow surface mark is a controlled, low-risk process. Removing a deep one requires grinding down a wide enough area to blend the edges, which increases both the material removed and the odds of creating a permanent distortion that’s harder to live with than the scratch you started with.
DIY Methods: Cerium Oxide Kits and Why Household Hacks Usually Fail
Cerium oxide is the material every legitimate windshield polishing product is built around, and for good reason. It works through both mechanical abrasion and a mild chemical reaction with the glass surface, gradually leveling the scratch instead of just buffing over it. Auto glass shops, optical labs, and even telescope-lens finishers have relied on cerium oxide for decades because it’s fine enough to polish without gouging fresh scratches into the surface it’s supposed to fix.
Most retail scratch-removal kits follow a similar formula. A typical box includes:
- Cerium oxide powder (sometimes pre-mixed into a paste)
- One or more felt or wool polishing pads
- A backer pad and drill or rotary tool adapter
- Small containers or a mixing dish for the slurry
- Basic instructions covering water ratios and polishing time
The general process looks straightforward on paper. You mix the cerium oxide with water into a slurry about the consistency of thin pancake batter, dampen the felt pad, and run a low-speed drill or polisher in small circular motions directly over the scratch and the surrounding area. Water has to stay constant throughout, both to keep the slurry workable and to carry away heat. Most instructions call for short polishing intervals of 60 to 90 seconds, followed by rinsing, drying, and checking progress before going again.
Pro Tip: Keep the drill speed on the low end of its range and let the cerium oxide do the work through repeated light passes. Pressing harder or running the tool faster doesn’t speed up the job. It just raises the odds of a hot spot or an uneven low point in the glass.
Where DIY attempts fall apart is usually one of two places: patience or heat control. A shallow scratch might need ten or more short polishing cycles to level out properly, and most people either quit after two passes and conclude the kit “doesn’t work,” or they get impatient and lean on the tool harder, which generates localized heat the glass can’t dissipate fast enough.
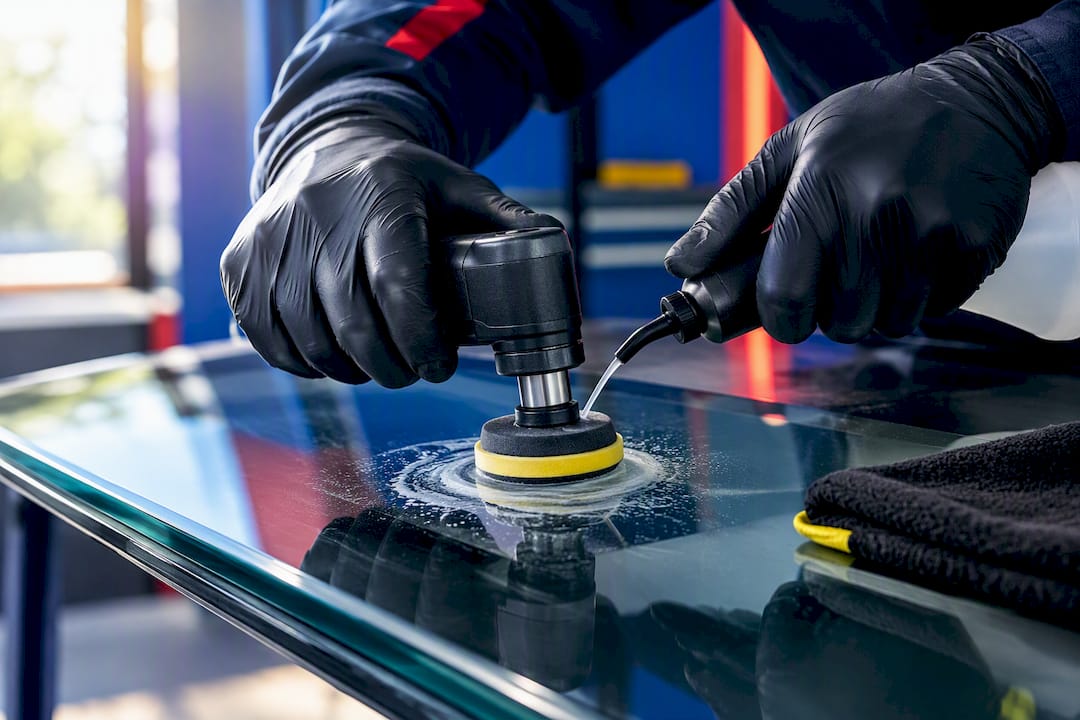
Household substitutes get recommended constantly online, and almost none of them hold up. Toothpaste contains abrasive silica or calcium carbonate, but the particle size is wildly inconsistent between brands and batches, so you’re essentially sanding glass with an unknown grit and no way to control it. Baking soda is even coarser and more uneven. Both can leave a hazy, dulled patch that’s permanent, because you’ve created thousands of microscopic scratches instead of removing one visible one. Once glass takes on that clouded texture, there’s no polishing it back to clear; you’re looking at replacement.
This is also the point where retail kits and professional results genuinely diverge, and it has nothing to do with the cerium oxide itself. Most kits replicate the same consumable that shops use but skip the tooling and procedural controls that keep heat and pressure inside a safe range. That gap, more than any difference in polishing compound, explains why the same product gets five-star reviews from some buyers and “didn’t do anything” complaints from others.
What Does a Professional Windshield Polishing Procedure Actually Look Like?
Automakers publish detailed polishing procedures for exactly this reason: to give trained technicians a repeatable process that avoids the failure points DIYers hit most often. Tesla’s service documentation lays out one of the more detailed public examples, and it’s worth walking through because it shows precisely where professional controls earn their keep.
- Inspect before starting. The technician confirms the scratch passes the depth and location screening, checks that the polishing kit and backer pads are in good condition, and cleans the surrounding glass so no grit gets ground into the surface during polishing.
- Set up the splash guard and water feed. A splash guard rings the work area to contain slurry and runoff, while a water feed bottle on a suction mount delivers a steady, hands-free drip directly onto the polishing pad. This is the step most DIY kits skip entirely, since most instructions assume you’ll periodically dip and re-wet the pad by hand.
- Mount the polishing disk and backer pad. The disk attaches to a low-speed rotary tool, matched to a backer pad sized for the scratch’s length so the pressure spreads evenly instead of concentrating on one point.
- Polish in controlled circular passes. The technician works the pad along the scratch line and outward into the surrounding blend zone, keeping consistent light pressure and a steady circular motion rather than pressing in one spot.
- Check glass temperature regularly. Tesla’s own guidance targets a working range of 115 to 150°F on laminated glass during polishing, checked by hand or with an infrared thermometer between passes. If the glass runs hotter than that band, the technician stops and lets it cool before continuing.
- Inspect from both sides after each pass. Trained techs check the inside of the glass for early clouding or haze, not just the outside where the polishing is happening, and stop immediately if clouding appears rather than continuing and hoping it buffs out.
- Clean and inspect the finished area. Once the scratch levels out, the glass gets a full clean, then a visual check under different lighting angles to look for any residual distortion before signing off on the repair.
- Break down and store the tools properly. Pads and disks get cleaned and stored separately to avoid cross-contaminating future jobs with old, worn-down grit.
That temperature range is the detail that separates a controlled repair from a gamble. Laminated windshield glass sits between two layers bonded with a plastic interlayer, and localized overheating can soften or damage that bond long before you’d notice any visible sign on the surface. Cerium oxide works well, but only with flood cooling and steady motion control. Skip the water feed, lean on the tool, and you’re pushing that same compound into a much higher-risk process without any of the checks that catch a problem before it becomes permanent.
None of this means a DIYer can’t approximate the process. It means the gap between “approximate” and “controlled” is exactly where most home attempts either succeed on a truly minor scratch or turn a cosmetic annoyance into a bigger, more expensive problem.
What Can Go Wrong With DIY Windshield Scratch Repair?
Optical distortion is the risk that catches people off guard, because it doesn’t show up until the repair is “finished.” A polished area that looks perfectly clear in the garage can throw a visible ripple or halo effect the moment you’re driving toward the sun at a low angle or facing oncoming headlights at night. That’s the concave dish problem again: uneven material removal creates a lens effect the glass never had before, and it’s often more disruptive to drivers than the scratch it replaced, especially anywhere near the driver’s sightline.
Thermal fracture is the more dramatic failure mode. Glass doesn’t handle uneven heat well, and a polishing pad run too fast, too hard, or without steady water feed can create a hot spot that stresses the surrounding material. In laminated windshields, that stress can propagate into a crack that wasn’t there before, sometimes minutes after the polishing stops and the glass cools unevenly. DIYers without splash guards, water feed, and temperature checks face meaningfully higher odds of causing exactly this kind of damage than someone following a controlled procedure.
There’s also a regulatory dimension worth knowing, particularly if you drive for work or operate a commercial vehicle. Federal rules for commercial motor vehicles specifically call out windshield obstructions and visual distortion as inspection-relevant safety defects, which means a poorly executed polish job in the wrong spot isn’t just an aesthetic risk. It can be a defect that affects a vehicle’s roadworthiness on paper, not just how it feels to drive.
Any windshield equipped with a forward-facing camera for lane keeping, automatic braking, or adaptive cruise control adds one more layer of caution. Polishing near that camera’s field of view risks introducing the exact kind of micro-distortion that throws off calibration, and there’s no way to “test drive” your way to confidence that a system is still reading the road correctly after a home repair in that zone.
What Tools and Materials Do You Need for Windshield Scratch Repair?
If you’re going ahead with a DIY attempt on a scratch that passed the fingernail test and sits well outside your direct sightline, the materials list is short but each item matters.
- High-purity cerium oxide powder, ideally a fine grade meant for glass rather than a generic metal-polishing compound.
- Felt or wool polishing pads sized to your scratch length, plus a backer pad that fits your rotary tool or drill adapter.
- A low-speed rotary polisher or a drill with a variable-speed trigger; higher fixed-speed drills make heat control much harder.
- A splash guard or improvised barrier to contain slurry runoff, and a water feed bottle with a suction mount if you can find or rig one.
- A way to check surface temperature, whether that’s a cheap infrared thermometer or simply the back of your hand between passes.
- Nitrile gloves, safety glasses, several clean microfiber towels, and an ammonia-free glass cleaner for before-and-after cleaning.
Skipping the water feed and splash guard is the most common corner people cut, mostly because kits rarely include them. That’s also the single biggest reason DIY results vary so much from one video tutorial to the next.
What Does Windshield Scratch Repair Cost?
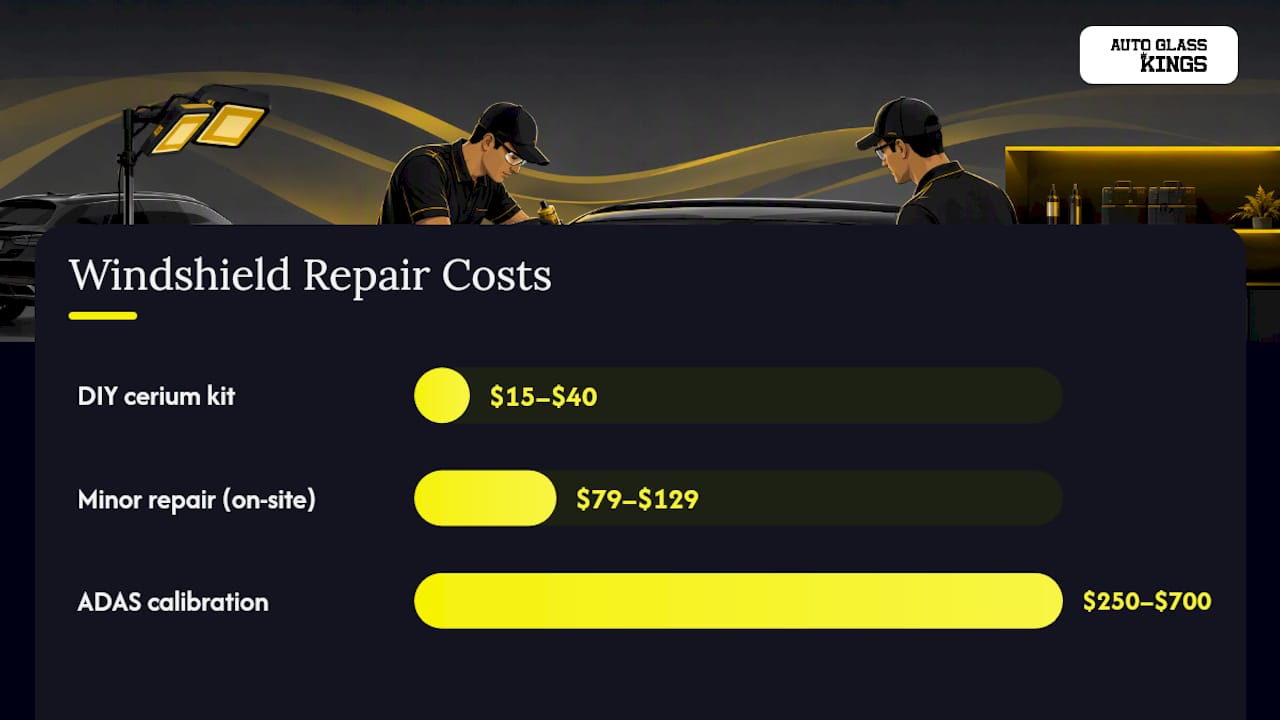
A basic cerium oxide kit typically runs somewhere in the range of $15 to $40, depending on how many pads and abrasive discs come included and whether a drill adapter is bundled in. That’s the ceiling on DIY cost, assuming you already own a drill.
Professional pricing splits along a similar line to the DIY-versus-replace decision itself. A straightforward chip or minor repair on a windshield that qualifies runs $79 to $129 at Auto Glass Kings, usually finished on-site in under an hour. Full replacement costs considerably more and varies with glass type, vehicle model, and whether the windshield carries ADAS sensors, but it typically becomes the recommended path once a scratch fails the fingernail test or sits inside the driver’s critical view.
ADAS calibration is the line item that catches a lot of owners off guard after replacement. Any windshield-mounted camera used for lane departure warnings, automatic emergency braking, or adaptive cruise control needs to be recalibrated once the glass is swapped, since even a properly installed replacement changes the camera’s exact position by a fraction of a degree. That calibration runs $250 to $700 depending on the vehicle and calibration type, and it can add anywhere from thirty minutes to a couple of hours to the appointment. Many insurance policies cover full replacement plus calibration when the damage meets their claim criteria, which is worth checking before assuming the cost falls entirely on you.
How Do You Choose a Windshield Repair Professional?
Not every glass shop or mobile technician handles scratch assessment and ADAS-equipped vehicles the same way, and the difference shows up fast once you start asking questions.
- Ask directly whether they perform ADAS calibration in-house or send the vehicle elsewhere afterward, since a second appointment adds time and hassle.
- Ask what glass they use for replacement and whether it meets OEM specifications, particularly for vehicles with sensor-integrated windshields.
- Ask what warranty covers the work, and get the terms in writing rather than a verbal assurance.
- Watch for red flags: a shop that can’t explain its polishing or replacement procedure, or one that gets vague when you ask about calibration equipment.
- Favor technicians who explain the fingernail test or the depth assessment they used to reach their recommendation, rather than a flat “no fix” or “yes we can buff it” answer with no reasoning attached.
Pro Tip: Ask a prospective technician what happens if a polishing attempt reveals the scratch is deeper than it looked once they start. A shop that has a clear answer for that scenario, rather than an improvised one, is usually the shop that has done this enough times to know where the line sits.
Mobile service, a documented lifetime warranty, and direct insurance billing are all reasonable trust signals when you’re comparing options, since they suggest a shop confident enough in its own work to stand behind it long after the appointment ends.
Can Resin Fill a Deep Windshield Scratch?
No, and this is one of the more persistent myths floating around online. Resin injection works for chip repair because a rock chip creates an actual cavity, a small fracture with air pockets, that resin can flow into under vacuum pressure and then cure into a clear, stable filling. A scratch is a different shape of damage entirely: a linear groove cut into the surface with no cavity underneath for resin to occupy.
Professional and trade guidance consistently points out that resin-based repair simply isn’t built for scratches, no matter how deep or shallow they run. Attempting it usually leaves a smeared or hazy residue sitting on top of the scratch rather than inside it, since there’s nowhere for the resin to actually bond and cure the way it does in a chip’s fracture pattern.
That leaves two real options for scratch damage, and only two: polish it down if it’s shallow enough to pass the fingernail test, or replace the windshield if it’s deep, positioned in the driver’s critical view, or intersects the zone read by an ADAS camera. Some sellers market “scratch repair resin” alongside chip-repair kits, and it’s worth reading the fine print. In most cases, that product is formulated for filling small chips and cracks, not leveling a groove, and using it on a scratch won’t produce a lasting or optically clean result.
If you’re unsure which category your damage falls into, that ambiguity itself is a good reason to get a quick professional look before buying any product. A five-minute inspection is cheaper than a kit that turns out to be the wrong tool for the job.
How Do You Keep a Windshield Scratch Repair Looking Good?
A polished area needs a short settling period before it gets treated like normal glass again. Avoid automatic car washes with brush contact for the first few days, since the polished zone, while structurally fine, can still be more sensitive to abrasive brush contact until it’s fully settled.
Stick to ammonia-free glass cleaners going forward, not just right after the repair. Ammonia-based products can interact poorly with certain factory windshield coatings over repeated use, and that holds true whether or not you’ve had a scratch polished out.
Check your wiper blades before you consider the job finished, especially if a torn or hardened blade caused the original scratch. Replacing a $10 to $20 blade is a lot cheaper than repeating the whole polishing process six months from now because the same culprit scratched the glass again. Keep the wiper reservoir topped off with actual washer fluid rather than running the blades dry across dusty glass, which is one of the most common ways fresh micro-scratches accumulate over a normal driving season.
Periodically run your own fingernail check across the polished zone every few months. Glass doesn’t “re-scratch” on its own, but catching a new mark early, before it’s driven over repeatedly by grit-loaded wipers, keeps a minor issue minor. If you ever notice new haze, a dull patch, or a shimmer that wasn’t there right after the repair, that’s worth a follow-up look rather than something to ignore.
When Does a Windshield Scratch Become a Safety Issue?
Most scratches are cosmetic. A few cross into safety territory, and knowing the difference matters more than knowing how to polish glass.
Position relative to the driver’s sightline is the biggest factor. A scratch directly ahead of the steering wheel, in the arc the wipers sweep across your primary view, has a much lower tolerance for any remaining distortion than the same scratch tucked near a corner of the glass. Federal safety standards for commercial vehicles specifically flag windshield distortion and obstructions in the driver’s forward view as inspection-level defects, and that same logic applies whether or not your vehicle happens to be commercial.
Depth is the second factor, and it circles back to the fingernail test one more time. A scratch a nail catches on has already breached deeper into structural glass, and while a single scratch rarely compromises a windshield’s overall strength on its own, deep or multiple scratches concentrated in one area can weaken that zone’s resistance to impact or stress over time.
Proximity to an ADAS camera or sensor bracket is the modern wrinkle older guidance doesn’t always cover. A scratch that’s cosmetically minor everywhere else on the glass becomes a bigger concern if it sits inside the camera’s field of view, since even slight optical interference in that specific zone can throw off how accurately the system reads lane lines or following distance.
If a scratch fails any one of those three checks, deep enough to catch a nail, positioned in your direct sightline, or anywhere near a camera housing, treat it as a safety question rather than a cosmetic one, and get a professional opinion before deciding how to proceed.
Do Weather and Humidity Affect Windshield Scratch Repair?
Environmental conditions during a polishing job matter more than most DIY tutorials mention. Cerium oxide slurry needs to stay wet and workable throughout the process, and dry, hot conditions cause the water in that slurry to evaporate faster than expected, turning a smooth polishing paste into a gritty, half-dried paste that behaves more like sandpaper than a controlled abrasive.
High humidity creates a different problem. Excess moisture on the glass surface before you start can dilute the slurry mix unevenly, leaving some areas over-wetted and others still dry, which produces inconsistent material removal across the scratch. Direct sunlight during the job compounds both issues by heating the glass surface independently of whatever friction the polishing pad generates, making it that much harder to keep the glass inside a safe working temperature range.
Dust is the quieter threat. Any grit that lands in the slurry, whether it blows in from a driveway, drops off a nearby tree, or simply sits on the glass from an incomplete cleaning beforehand, acts as a rogue abrasive with an uncontrolled grit size. That’s often how a single clean scratch turns into a small cluster of fresh, finer scratches around the original repair zone.
The practical takeaway: work in a garage or fully shaded, wind-sheltered space if at all possible, on a mild day rather than a hot or humid one, and clean the glass thoroughly immediately before starting. Professional mobile technicians build these same environmental controls into how and where they schedule a job, which is part of why shop results tend to be more consistent than a driveway attempt on a random Saturday afternoon.
A Pro’s View on Choosing Safety Over a Perfect-Looking Fix
Every technician who’s spent real time polishing windshields has a story about a customer who wanted a scratch gone from directly in their line of sight, and the conservative answer was still: replace it. That’s not caution for caution’s sake. It comes down to how much material has to be removed to blend a deep repair, and how much that removal raises the odds of a distortion that’s worse to drive with than the original scratch ever was.
The DIY failures worth learning from usually share a pattern: someone with a decent kit and good intentions runs the polisher too fast, skips the water feed because their kit didn’t include one, and either creates a cloudy patch that never buffs back to clear or, in worse cases, a hot spot that turns into a crack day after the “repair” looked finished. None of that means every scratch needs a replacement. It means the honest answer depends on depth and position, not on how motivated you are to avoid a shop visit.
If the fingernail test leaves you uncertain, or the scratch sits anywhere near your direct sightline or a camera housing, get it looked at before you commit to a kit. A five-minute inspection costs you nothing close to what a bad polishing attempt might.
— Auto Glass Kings
Get a Professional Windshield Scratch Assessment From Auto Glass Kings
A professional-grade equivalent of the fingernail test can be done on-site before spending money guessing which category your scratch falls into. A technician inspects the depth, checks its position against your sightline and any camera housing, and tells you plainly whether polishing is realistic or whether replacement is the safer call.

If replacement turns out to be the right move, everything happens in one mobile visit, including any ADAS recalibration your vehicle needs, so you’re not stuck booking a second appointment at a dealership afterward. Every install carries a lifetime warranty, appointments start as early as 5 AM to fit around a workday, and Auto Glass Kings bills most insurance claims directly, which means many customers pay nothing out of pocket. Whether your damage turns out to be a simple repair or a full windshield replacement, the fastest way to know for sure is a real inspection rather than another forum thread. Get a quote and find out exactly what your windshield needs.
Sources
- 49 CFR § 393.60 – Windshield wipers and windshield
- Windshield Scratch Repair — Tesla Service Manual (2025)
- Windshield scratches: depth test, polishing, and limits — QuickFix Windshields
- DIY windshield repair risks — Falk Auto Body
- Glass Polishing Kit, Cerium Oxide Scratch Removal Set — product listing
FAQ
Can You Remove Scratches From a Windshield Yourself?
Yes, but only shallow ones. If a fingernail doesn’t catch when dragged across the mark, cerium oxide polishing can usually level it out with patience and steady water flow. Deeper scratches that catch a fingernail need professional assessment rather than a home kit.
Can Auto Glass Kings Repair Scratches?
Auto Glass Kings inspects each scratch’s depth and position first, then recommends repair or replacement based on whether it can be safely leveled without creating distortion. For scratches that don’t qualify for a cosmetic fix, the team handles full windshield replacement with OEM-quality glass and in-house ADAS calibration in one mobile visit.
Does WD-40 Remove Scratches From Glass?
No. WD-40 is a lubricant, not an abrasive, so it has no ability to level or remove material from a glass surface. At best, it temporarily fills a shallow scratch with oil that makes it look less visible until the residue wipes away or evaporates.
How Do You Remove Deep Scratches From Glass?
Deep scratches, ones a fingernail catches on, generally cannot be polished out safely without risking a visible dish or optical distortion in the repaired area. Professional guidance points toward replacement rather than aggressive polishing once a scratch reaches that depth, especially anywhere near the driver’s sightline.
How Much Does Professional Windshield Scratch Repair Cost?
A standard repair through Auto Glass Kings runs $79 to $129, typically completed in under an hour on-site. If the damage requires full replacement instead, cost depends on the vehicle and glass type, and ADAS calibration, when needed, adds $250 to $700 to the total.
Recommended
Share
Recent Posts
October 6, 2026
1–3 Hours Per Door: Run Channel Replacement That Puts Fitment First
DIY run channel replacement with a fitment-first approach. Follow parts, tools, and a 1–3 hours per door procedure, plus when to call a...
October 5, 2026
Expect $305–$3,400: U.S. Tesla Windshield Costs and How to Save
U.S. model-by-model Tesla windshield price ranges ($305–$3,400 observed). Practical steps to cut out-of-pocket costs, mobile ADAS calibration options, and…...
October 4, 2026
Drivers, Follow Your Installer’s Wash Time After Windshield Replacement
Follow your installer’s written safe-wash time. If none, wait 24 hours for a hand wash and 48 to 72 hours before automatic or...