Automotive
Yes, EyeSight needs calibration after nearly any windshield removal, front-end repair, or camera work. If your Subaru shows an EyeSight warning or you just had glass work done, do not rely on adaptive cruise or lane keep until the system is checked. Schedule calibration with a shop that follows Subaru’s static target procedure. The job itself usually takes under 90 minutes.
TL;DR:
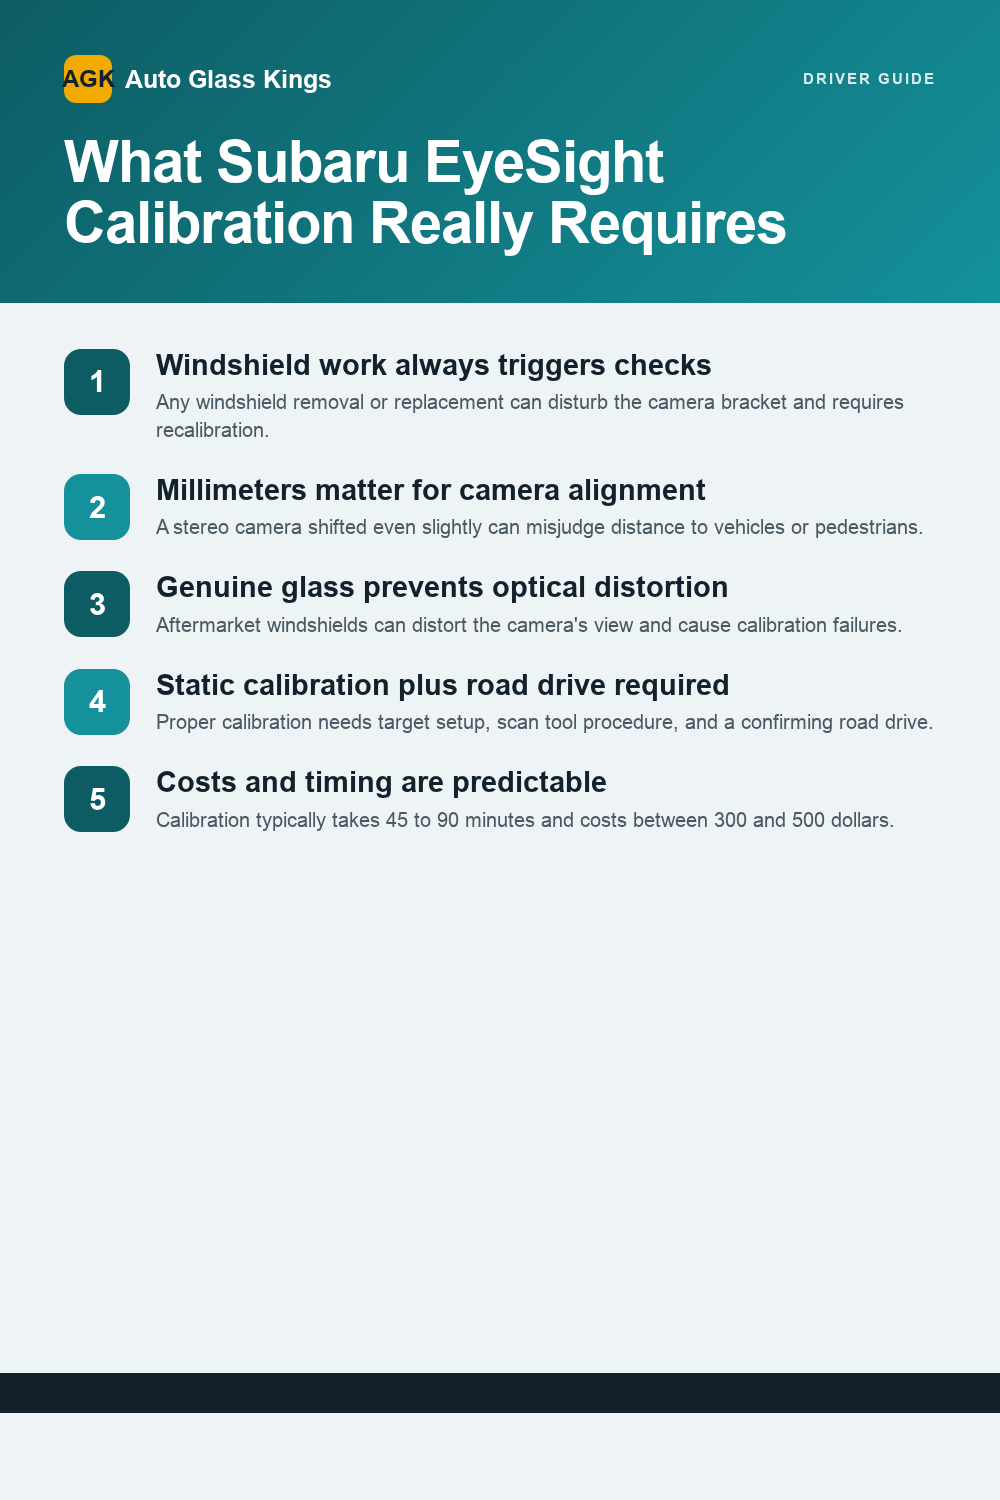
- Windshield removal or replacement, collision damage, or suspension changes always require recalibration to ensure EyeSight’s cameras are properly aligned.
- Genuine Subaru glass and indoor calibration setups with OEM targets help prevent calibration failures caused by optical or mounting issues.
- Independent shops with Subaru-specific tools and experience can perform accurate calibrations, but the process must include a static target setup, scan tool procedure, and road drive for proper confirmation.
- Calibration typically takes 45 to 90 minutes and costs between $300 and $500, with extra charges if camera or bracket repairs are necessary.
- Recurring EyeSight warnings or system malfunctions after repairs often indicate misalignment or a failed calibration that requires rechecking or replacing components.
Table of Contents
- What Is Subaru EyeSight Calibration, and Why Does Camera Alignment Matter?
- When Does Subaru EyeSight Calibration Become Necessary?
- How Does Subaru EyeSight Calibration Actually Work?
- Who Can Perform Subaru EyeSight Calibration Correctly?
- How Much Does EyeSight Calibration Cost, and How Long Does It Take?
- What Do Common EyeSight Warnings Mean, and How Do You Fix Them?
- What Can You Do to Avoid Unnecessary Recalibration?
- How Auto Glass Kings Handles EyeSight Calibration
- Choosing Between Dealer and Mobile Calibration: An Editorial Take
- Book Mobile Windshield Replacement With Calibration Included
- Primary Resources for Subaru EyeSight Procedures
- Sources
- FAQ
What Is Subaru EyeSight Calibration, and Why Does Camera Alignment Matter?
EyeSight relies on a stereo camera pair mounted at the top of your windshield, just behind the glass. The two lenses work like a pair of eyes, comparing slightly offset images to judge distance, detect lane lines, and spot pedestrians or stopped cars ahead. That depth calculation only works if both cameras sit at the exact angle and position Subaru’s engineers designed them for.
Move that assembly even a few millimeters, and the math breaks down. A camera tilted slightly downward might think the car ahead is closer than it actually is. One tilted upward could miss a stopped vehicle entirely. This is why Subaru service manuals require inspection and adjustment of the stereo camera any time the windshield is removed or replaced, and why they specifically warn against aftermarket glass in the EyeSight viewing area.
Windshield glass itself plays a bigger role here than most owners realize. Optical clarity, curvature, and even the thickness of the glass in the camera’s sightline can distort what the stereo pair sees. That is the real reason Subaru pushes so hard for genuine glass in that zone rather than a generic aftermarket pane that technically fits the frame.
A few things that can throw off camera alignment even when the glass itself looks fine:
- A windshield installed slightly off-center in the pinchweld, shifting the camera’s reference point
- A camera bracket that was reused after damage instead of replaced
- Adhesive that hasn’t fully cured before the vehicle is driven, letting the glass settle unevenly
- Dirt, film, or a small crack directly in the camera’s field of view
None of these issues are always visible from the driver’s seat. That is exactly why calibration isn’t optional paperwork. It’s the only way to confirm the camera actually sees what Subaru’s software assumes it sees.
When Does Subaru EyeSight Calibration Become Necessary?
Not every repair triggers the need for recalibration, but more events qualify than most owners expect. Here is the practical checklist.
- Windshield removal or replacement. Any time the glass comes out, even for an unrelated repair, the camera bracket gets disturbed enough to require a check.
- Non-genuine or incorrectly installed glass. Aftermarket windshields that don’t match Subaru’s optical specs in the camera zone are a common cause of calibration failures.
- Stereo camera removal, replacement, or bracket damage. Swapping the camera unit itself, or repairing a cracked mounting bracket, always requires a full static calibration.
- Front-end collision or body damage. Even a moderate impact can shift the camera’s axis relative to the vehicle’s centerline, even when the windshield survives intact.
- Wheel alignment or suspension repair. Changes to ride height, toe angle, or suspension geometry alter how the camera’s reference plane lines up with the road, and Subaru’s own diagnostic manuals list this as a calibration trigger.
- Battery disconnection, replacement, or software updates. These don’t move the camera physically, but they can reset stored calibration data and trigger a warning light.
- Any displayed EyeSight or ADAS warning. If the dash shows an alert, treat it as a symptom requiring diagnosis, not something to ignore until it clears itself.
Beyond these events, watch for softer symptoms that suggest something is off even without a dashboard warning. Adaptive cruise control that suddenly won’t engage, lane departure alerts that fire inconsistently on straight roads, or pre-collision braking that feels twitchy are all signs the system has lost confidence in what it’s seeing. Calibration requirements do shift slightly by model year, since Subaru has refined the EyeSight hardware and software several times since its introduction, so a shop that specializes in your specific generation matters more than it might seem.
How Does Subaru EyeSight Calibration Actually Work?
Every Subaru EyeSight calibration follows a version of the same OEM workflow: a static setup with a physical target, a scan tool session, and a road drive to finish the job. Here’s what each stage actually involves.

Getting the car ready
Before any target goes up, the vehicle itself needs to meet specific conditions. The floor must be level, tire pressures set to spec, fuel level and cargo load within the range Subaru specifies, and the steering wheel centered. Dashboard clutter, phone mounts, or anything reflective near the windshield has to come off, since glare and obstructions in the camera’s view can throw off the whole procedure before it even starts.
Setting up the static target
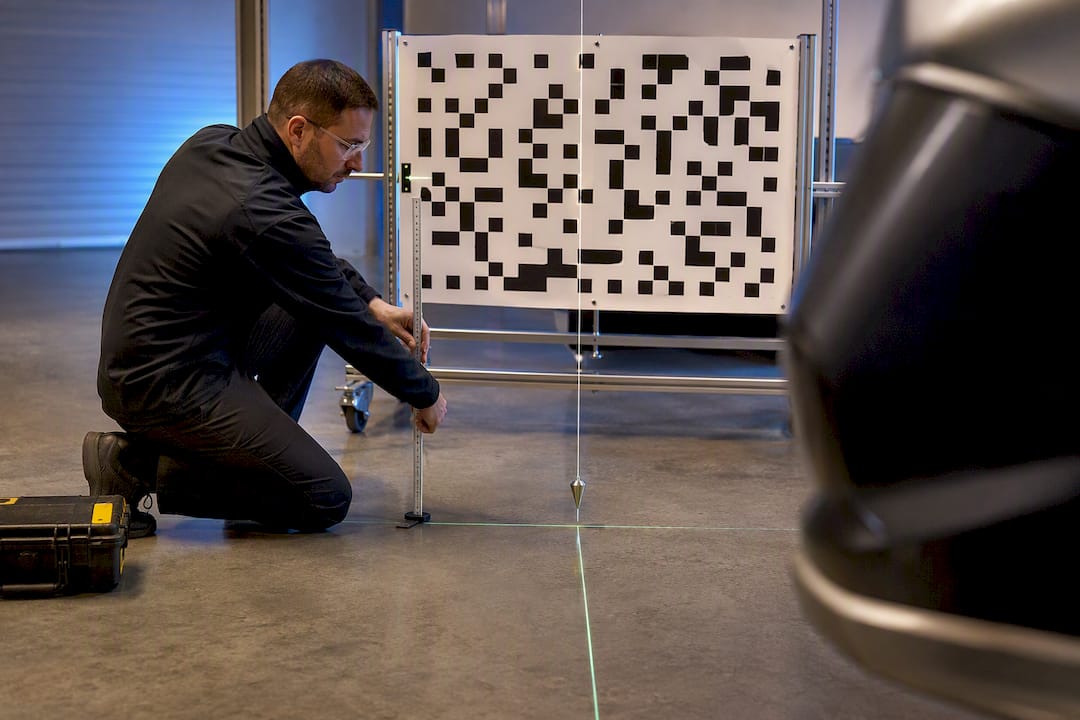
This is where precision separates a real calibration from a rushed one. A technician establishes the vehicle’s exact centerline using a plumb bob, then measures out the specified target distance, roughly 4,070 millimeters, or about 13 feet, from the front of the vehicle. A printed RANDOM CHART target gets mounted on a partition or wall at that distance, squared to the vehicle’s centerline.
Subaru’s tolerances here are tight: centering accuracy within about 4 millimeters and measuring accuracy within 2 millimeters, according to the service manual’s camera adjustment procedure/BODY%202%20SECTION/EyeSight%20ES/6%20Camera%20Adjustment%20Inspection.pdf). Lighting matters too. Uneven light, glare on the target, or reflections bouncing off the windshield can all cause a failed read, which is why most static calibrations happen indoors under controlled lighting rather than in a parking lot.
Running the scan tool workflow
With the target in place, the technician connects a Subaru Select Monitor loaded with current software, navigates to the EyeSight section, then into Work Support, and selects the camera adjustment or inspection function. The tool walks through the adjustment sequence and confirms whether the camera reads the target correctly within tolerance. Results get saved as part of the vehicle’s service record.
The drive that finishes the job
Static calibration alone doesn’t complete the process. Subaru’s procedure calls for an automatic adjustment drive afterward: driving on a straight road with visible lane markings on both sides, at roughly 25 miles per hour or more, while maintaining a steady distance from the vehicle ahead. This lets the system fine-tune its recognition in real-world conditions rather than just a controlled bay setup.
Pro Tip: Ask your shop whether they use a laser-guided fixture instead of a manual plumb bob and tape measure. Aftermarket ADAS fixtures and laser-guided systems can square up the target faster and more consistently than hand measurements, which matters given how tight Subaru’s tolerances are.
Some independent shops lean on these laser systems specifically because they cut down on the human error that a plumb bob and chalk line can introduce, especially in a shop that services more than one make.
Who Can Perform Subaru EyeSight Calibration Correctly?
Dealerships aren’t the only qualified option, but the bar for “qualified” is higher than a lot of shops let on.
Subaru dealers have direct access to Subaru Select Monitor software, official targets, and factory documentation. They tend to be conservative about calibration procedures, which is a strength when your repair involves camera replacement or collision damage, though it can also mean longer wait times.
Independent ADAS shops and mobile providers can do equally solid work, provided they check the right boxes. Before booking with any independent or mobile provider, confirm they have:
- A Subaru Select Monitor or a validated alternative scan tool with current Subaru coverage
- The correct OEM target or a validated aftermarket ADAS fixture, not an improvised printout
- Actual experience calibrating Subaru EyeSight specifically, not just generic ADAS systems
- A documented post-calibration check, including saved scan logs you can request a copy of
One nuance worth knowing: some calibrations genuinely need a fixed, indoor setup with a wall-mounted target and controlled lighting, which rules out a curbside calibration entirely. Others, particularly straightforward windshield replacements without camera damage, can be handled by a mobile provider carrying the right equipment to your driveway or workplace. The distinction usually comes down to whether the vehicle needs a stationary target environment or can be calibrated with a portable fixture that meets the same distance and lighting requirements.
How Much Does EyeSight Calibration Cost, and How Long Does It Take?
Most static calibrations take between 45 and 90 minutes, covering the inspection, target setup, scan tool session, and the confirmation drive. Add extra time if the camera itself needs replacement or the mounting bracket was damaged and needs repair first.
Cost varies more than time does. A few things drive the price up or down:
- Whether calibration is bundled into a windshield replacement job or billed as a standalone service
- Whether the camera unit or bracket needs replacing, not just realigning
- Multiple failed calibration attempts, which can happen with damaged brackets or poor lighting conditions
- The shop’s own tooling, since a facility running laser fixtures may price differently than one relying on manual setup
Industry estimates commonly put standalone EyeSight calibration in the $300 to $500 range, with 45 to 90 minutes of labor, though this varies by shop and region and should be treated as a general estimate rather than a fixed quote.
If your windshield damage came from a covered event, direct insurance billing can eliminate most or all of that cost. Ask any shop for a line item breakdown before work starts: glass cost, labor, and calibration listed separately, not bundled into one vague total. That documentation matters if you ever need to dispute a claim or prove the work was done to spec.
What Do Common EyeSight Warnings Mean, and How Do You Fix Them?
An EyeSight warning after glass or front-end work almost always traces back to one of a handful of causes, and most are fixable without a major repair.
“EyeSight system disabled,” “Pre-collision braking system OFF,” and “Lane departure warning OFF” are the three most common messages owners see. Before assuming the worst, check the simple stuff: make sure nothing is blocking the camera’s view, confirm the windshield near the camera is clean and free of chips or cracks, and check that no aftermarket dash cam or accessory is mounted in the camera’s field of view.
If the warning persists past a basic visual check, a scan tool becomes necessary to pull the actual fault codes. Codes point technicians toward the real problem rather than guessing, whether that’s a misaligned camera, a wiring fault, or a sensor that failed outright.
Roughly one in five vehicles referred for ADAS work show a repeat calibration failure on the first attempt, often traced back to lighting conditions, target placement error, or an unaddressed bracket issue rather than a bad camera. That single data point is worth knowing before you assume a failed calibration means a defective part.
If the warning keeps returning after a proper static calibration and road drive, the next step is usually camera replacement, bracket repair, or a deeper electrical diagnostic. Before your appointment, write down the exact warning text, note when it first appeared, and take a photo of the windshield and camera area. That information speeds up diagnosis and often saves you a second visit.
What Can You Do to Avoid Unnecessary Recalibration?
Prevention here is mostly about avoiding shortcuts during glass work, not about anything you do while driving day to day.
- Choose Subaru genuine glass in the EyeSight viewing area whenever it’s an option, since optical mismatches in aftermarket glass are a documented cause of calibration trouble.
- Ask any installer whether they follow ADAS-aware pinchweld preparation and whether calibration is included as part of the windshield job, not billed as a surprise add-on later.
- Keep the dashboard clear of clutter, sunshades, and reflective objects near the camera housing, and wipe the windshield area in front of the camera when you clean your car.
- Address suspension noise, alignment pulls, or uneven tire wear promptly, since these issues can shift the camera’s reference plane even without any glass work involved.
- Keep tire pressures at spec. Underinflated or mismatched tires change ride height slightly, which can be enough to throw off a camera that was calibrated at the correct height.
How Auto Glass Kings Handles EyeSight Calibration
A mobile windshield replacement and in-house ADAS recalibration combined visit can eliminate the need for a separate trip to a second shop for calibration after the glass goes in. That matters for EyeSight specifically, since the camera work and the glass work are tied together by design.
The process uses OEM-quality materials, addressing potential optical concerns about aftermarket glass in the camera zone. Every install carries a lifetime warranty, and the calibration follows a documented workflow including scan tool logs saved as part of the job record, a checklist confirming target setup and tolerances, and a completed road drive before the vehicle is returned.
Early-morning mobile appointments cut down the downtime that comes with dropping a car at a dealership and waiting for a callback. Direct insurance billing handled in-house can reduce or eliminate out-of-pocket costs when the repair is tied to a covered claim. You can see examples of how that calibration process plays out in practice on real jobs the shop has documented.
Choosing Between Dealer and Mobile Calibration: An Editorial Take
The dealer versus independent debate gets treated as a loyalty question online, and it shouldn’t be. It’s a damage-severity question. If your EyeSight camera itself was damaged, if the bracket needed repair, or if you’ve already been through a failed calibration attempt, go to a shop with dealer-level diagnostic depth. That’s not brand snobbery. That’s matching the tool to the problem.
For a routine windshield replacement with no collision damage and no prior calibration failures, a documented mobile provider is a legitimate, often more convenient choice. The differentiator isn’t the location of the service bay. It’s whether the shop hands you saved scan logs and a completed checklist, or just a verbal “you’re all set.” Ask for that documentation every time. If a warning returns after a calibration you paid for, escalate immediately rather than driving around hoping it clears itself.
— Auto Glass Kings
Book Mobile Windshield Replacement With Calibration Included
Handling the glass and camera work as a single mobile visit avoids a separate dealer trip and eliminates the gap between replacement and recalibration where EyeSight might be disabled.
The service can include OEM-quality glass, in-house ADAS recalibration, a lifetime warranty on the install, and direct insurance billing handled by the provider. Before booking, have your vehicle’s model and year ready, note any recent repairs or accidents, and write down the exact text of any EyeSight warning you’ve seen on the dash. That information helps the technician prep the right target and scan tool workflow before arriving.
If your windshield needs replacing and EyeSight needs a documented, OEM-aligned calibration to match, start with the ADAS calibration page to check availability, or get a quote directly through the windshield replacement booking page for early-morning scheduling in Orange County.
Primary Resources for Subaru EyeSight Procedures
Technicians and owners who want the underlying OEM detail can reference the service manual camera adjustment procedure, Subaru-specific calibration bulletins tracked by I-CAR’s research tips, and independent shop coverage of Subaru repair events like alignment and suspension work that can trigger a calibration requirement.
Sources
- Cracking ADAS – Windshield Replacement | ALLDATA
- Calibration Research Tips: Subaru EyeSight – UPDATE
- Subaru Eyesight Calibration — Tomorrow’s Technician
FAQ
How Do You Reset EyeSight on a Subaru?
There’s no simple driver reset for a genuine EyeSight fault. Clearing a warning typically requires a shop to run the full static calibration and scan tool workflow, followed by the confirmation road drive.
What Is the Lawsuit Against Subaru EyeSight?
Various legal claims and complaints have circulated regarding EyeSight performance issues, including alleged false braking events, but specifics vary by case and jurisdiction. Owners concerned about a specific claim should consult legal counsel or Subaru directly rather than relying on general summaries.
How Is Subaru EyeSight Calibration Done?
It combines a static target setup measured against the vehicle’s centerline, a Subaru Select Monitor scan tool session to run the camera adjustment, and a required road drive afterward at roughly 25 miles per hour or more to finish fine-tuning recognition.
Who Can Calibrate Subaru EyeSight?
Subaru dealers and qualified independent or mobile shops can both do it correctly, provided they use the proper scan tool, an OEM or validated aftermarket target fixture, and follow the documented OEM procedure, which is how Auto Glass Kings structures its in-house calibration process.
How Long Does EyeSight Calibration Take?
Most static calibrations take 45 to 90 minutes, including the confirmation drive, though camera replacement or bracket repair adds extra time to the visit.
Recommended
🎧 Listen to This Article
Share
Recent Posts
October 6, 2026
1–3 Hours Per Door: Run Channel Replacement That Puts Fitment First
DIY run channel replacement with a fitment-first approach. Follow parts, tools, and a 1–3 hours per door procedure, plus when to call a...
October 5, 2026
Expect $305–$3,400: U.S. Tesla Windshield Costs and How to Save
U.S. model-by-model Tesla windshield price ranges ($305–$3,400 observed). Practical steps to cut out-of-pocket costs, mobile ADAS calibration options, and…...
October 4, 2026
Drivers, Follow Your Installer’s Wash Time After Windshield Replacement
Follow your installer’s written safe-wash time. If none, wait 24 hours for a hand wash and 48 to 72 hours before automatic or...